Stencil tutorial 3:
Getting healthy
In the previous posts, I created a very basic Tower Defense Game with wandering enemies and pre-placed towers that can kill enemies. In most TD games, enemies are not killed outright but damaged. In this part, I will introduce the pre-shipped Health Manager and use it to make the towers deal damage.
I will also create a new behavior to show visual feedback on damage. This will include the concept of “Run later” blocks which can be very very tricky.
The result can be seen here; you can also download it from StencylForge under the name “Publysher - TD Tutorial #3”.
A Bit of Theory
In all TD games that I know of, every time a tower hits an enemy it deals a certain amount of damage. This amount has a lower and an upper bound, and the exact amount is usually determined at random. The bounds are usually determined by the level of your tower.
At the same time, most TD games give some kind of visual feedback to indicate the current amount of hitpoints each enemy has. This is usually indicated by a green bar that is proportional to the health of the enemy.
In computer terms, when a tower shoots an enemy, it has to communicate the amount of damage it dealt to the enemy. The enemy can then downgrade its amount of hitpoints according to the amount of damage dealt. StencylWorks provides two kinds of communication between actors: Triggers/Events and Custom Blocks.
Triggers are the most easy: you send a message to one or more actors, and if one or more behaviors on those actors happen to listen to that kind of message (using Custom Event blocks), they react. If they don’t listen, nothing happens.
Custom Blocks are parts of a behavior that can be called directly by other actors. They are available on your Behavior palette under the “Custom” tab. Custom Blocks are much more descriptive than triggers, and you can add extra information (Block Fields) to custom blocks. This makes Custom Blocks much more powerful. Custom Blocks have two downsides:
- if the target actor does not have the behavior with that custom block, it will behave strangely.
- custom blocks cannot multicast – when you send a trigger to an actor, every behavior listening to that trigger will activate
Tip: for communication, prefer triggers whenever possible. Only if you really need to send extra data with your messages, use Custom Blocks.
The Health Manager
Time to do stuff. The first thing we are going to do, is to add the pre-shipped Health Manager behavior to our enemy actor:
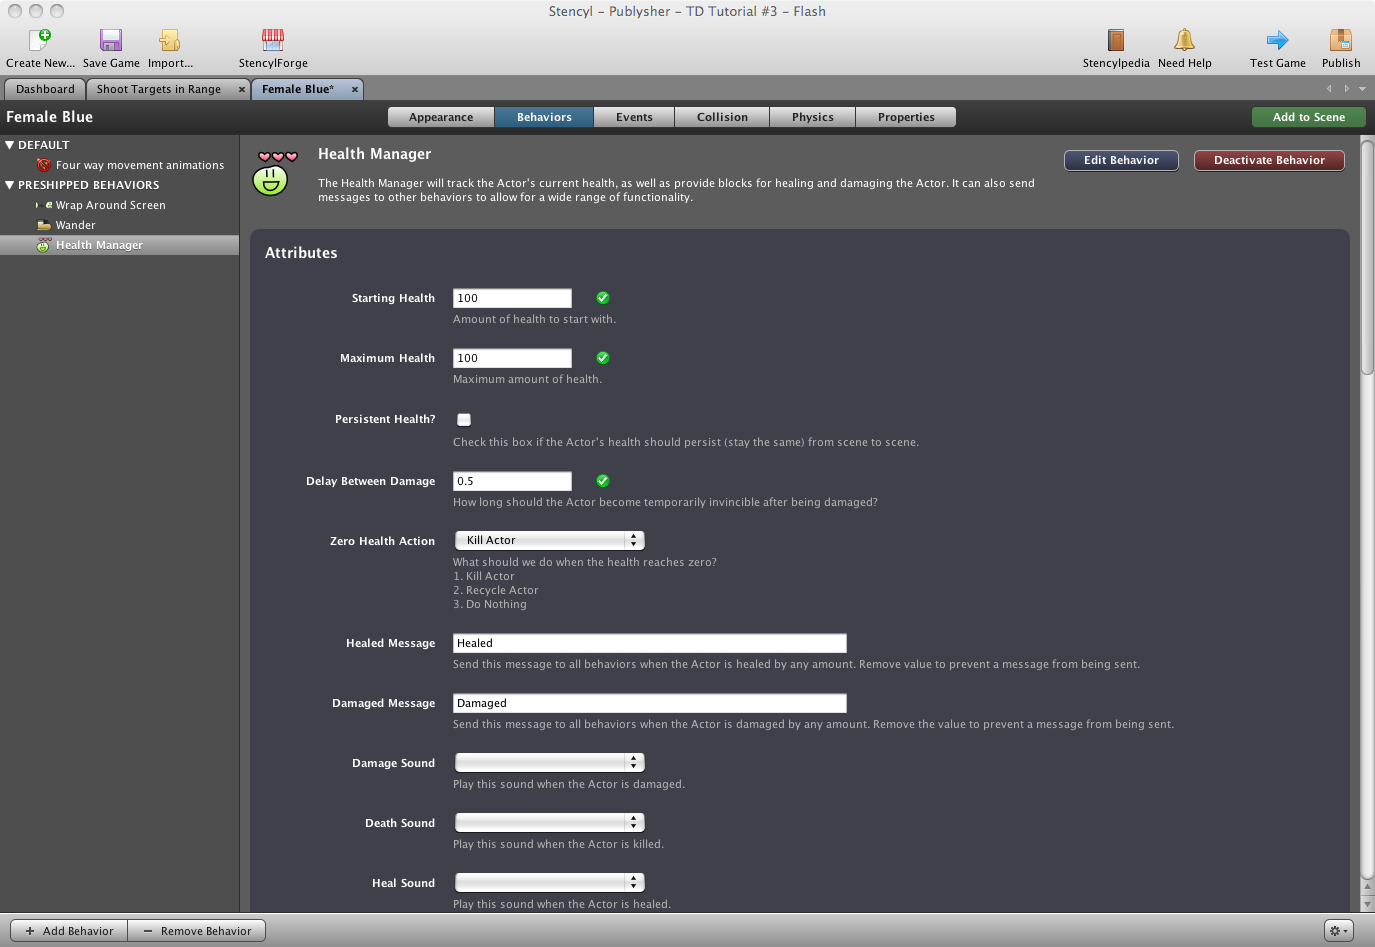
Set the following attributes:
- Starting Health – 100
- Maximum Health – 100
- Zero Health Action – Kill Actor
- Health Bar Orientation – Horizontal
- Health Bar Width – 20
- Health Bar Height – 5
- Health Bar X Offset – -2
- Health Bar Y Offset – -8
- Health Bar Outline Size – 1
- Health Bar Outline Color – black
- Health Bar Background Color – white
- Color over 75% – dark green
- Color over 50% – dark green
- Color over 25% – orange
- Color under 25% – red
Leave the other attributes as is, and press “Test Game”. Wow. Each enemy now has a nice health bar over her head. Sure, they are still killed immediately when nearing a tower, but already it looks much better.
Tip: the Health Manager behavior is really cool
Damaging Behavior
Now that our enemies have a concept of health, it is time to deal some damage. To do this, we are going to modify the “Kill Targets in Range” behavior. For starters, go to the Properties tab and rename the behavior to “Shoot Targets in Range”.
Tip: always ensure the names of your behaviors are correct. Update the names whenever your behavior’s name no longer reflects what’s really happening.
Now, we are going to introduce the concept of “shooting”. We could integrate this into our existing “Enemy enters region” event, but good computer programming practices suggest that a new concept requires its own block. Click “Add Event” and choose “Advanced”, “Custom Block”. Then, press the Create Custom Block button and create one as follows:
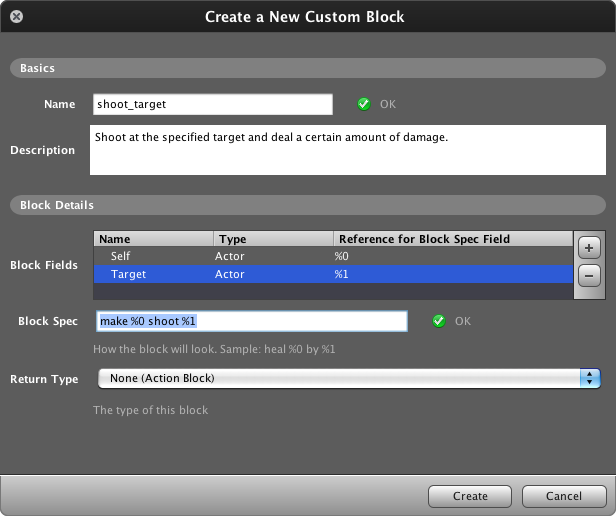
Then, create two new Number attributes called Minimum Damage and Maximum Damage, and make sure your behavior works like this:
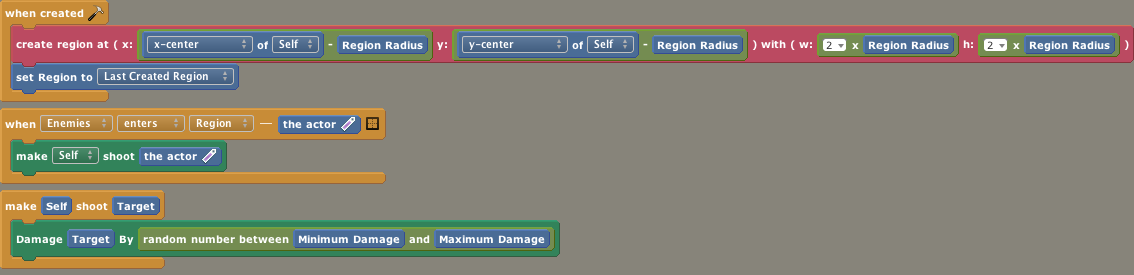
The “make [self] shoot [the actor]” block can be found on the palette under “Custom”. If not, close the behavior and open it again. Custom blocks sometimes don’t appear immediately.
The “Damage [actor] by [number]” block can also be found under the “Custom” tab. This custom block was not created by me; instead, it is provided by the Health Manager. Did I mention the Health Manager behavior is really cool? This is an example of two actors communicating with each other through Custom Blocks.
If you look at the current version of “Shoot Targets in Range”, you might wonder why on earth I want a separate custom block called “Shoot Target”. I could just as easily have done without it.
Tip: whenever you create a new concept in your behavior, create a Custom Block or Custom Event. This will ensure you can keep understanding your behaviors, even if they get more complicated.
Putting it Together
The last step is to attach the new behavior to our Tower actor. Set the minimum damage to 25 and the maximum damage to 101. This means that on average it will take two hits to kill an enemy; sometimes a tower will get lucky and kill an enemy in one shot; and sometimes a tower will get unlucky and will require four hits.
And that’s it! Press the “Test Game” button once more and see how the enemies are no longer killed outright.
In the Blink of an Eye
One thing that’s annoying in our current game is that you can easily miss an enemy being damaged. That’s a shame, because a lot of fun is in the killing. We need more visual feedback on each hit.
While you might be inclined to Mortal Kombat-styled gore and splatter effects, the pixel art used in this tutorial calls for a tried and proven technique: flickering. Flickering is a subtle effect that nevertheless catches the eye. And it’s not pre-shipped.
This calls for new behavior. Let’s get back to thinking mode. Whenever our actor is damaged, we want the actor’s sprite to disappear and reappear a few times. But how do we know when our actor has been damaged?
The easiest way would seem to be to hack the Health Manager – after all, that’s where the damage happens. But let’s recall the first section where I talked about Triggers. They turn out to be very useful in this case: if you peek at the Health Manager behavior you can see that it has an interesting attribute called: “Damaged Message”. Whenever an enemy is damaged, it will trigger the “Damaged Message”. So, by just listening to the “Damaged Message” we can add new behavior to our actor without modifying the pre-shipped behavior.
Tip: whenever possible, avoid changing pre-shipped behaviors.
Let’s continue thinking: how much time should there be between hiding and showing the sprite? How often should we repeat this? What is the actual value of this “Damaged Message” attribute in the Health Manager? We don’t know.
Now it’s time to create our new behavior. Let’s begin by creating a new Design-mode Actor behavior called “Flicker When Damaged”. Recall my previous tips:
- When in doubt, create an attribute
- For each concept, introduce a custom event or custom block
- Whenever possible, prefer custom events
Create three new attributes:
- a Text attribute called “Damaged Event” with the default value “Damaged”
- a Number attribute called “Flicker Delay” with the default value “0.1”
- a Number attribute called “Flicker Count” with the default value “3”
and look at the result:
Now attach this behavior to our enemy, press “Test Game” and be prepared for a small disappointment: our enemies flicker, but they flicker only once!
It’s All About… Timing
So, what’s happening here? The problem is that when a behavior executes, the “Do after [N] seconds…” block only schedules future action – the behavior does not wait for those future actions but instead starts repeating immediately. What actually happens is this:
- Hide sprite for Self
- Schedule something in the future
- Hide sprite for Self
- Schedule something in the future
- Hide sprite for Self
-
Schedule something in the future
[… after 0.1 seconds …]
- Show sprite for Self
- Show sprite for Self
- Show sprite for Self
As you might gather, hiding a hidden sprite does nothing; showing a visible sprite does nothing; so in effect, what happens is:
-
Hide sprite for Self
[… after 0.1 seconds …]
-
Show sprite for Self
And this is exactly the behavior we observed.
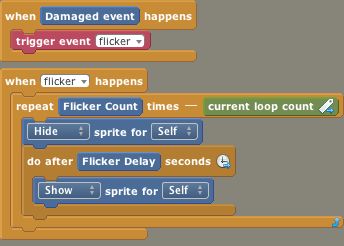
The eventual solution consists of adding a new hidden Number attribute called “Current Flicker Count” and the following behavior:
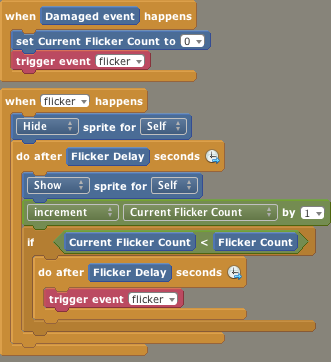
Here we use the Current Flicker Count attribute to keep track of the number of flickers so far. The greatest surprise is at the end: when we haven’t reached our goal, we trigger “Flicker” from within the “Flicker” event block. This was only possible because I listened to my own tips and created a new Custom Event.
Wrapping Up
In this tutorial I have:
- introduced the pre-shipped Health Manager behavior
- created a new behavior for my towers to damage instead of kill the enemies
- talked a lot about triggers and custom blocks
- used an existing trigger to respond to damage
- created a new trigger to get a timed flickering effect
The final result can be played here and the game can be downloaded from StencylForge under the name “Publysher - TD Tutorial #3”.
In part four of this tutorial I will make shooting at enemies more appealing.
Do the wave
Staying alive
Satisfaction
Creating towers
Follow the path
Choosing your target
Shooting
Getting healthy
Adding towers
the humble beginnings
Making Preparations