Stencil tutorial 6:
Follow the path
Today it’s time to change our enemies from harmless wandering puppets into goal-oriented path-following critters. I will introduce the concept of paths, following paths and spawning, and I will guide you through the creation of a new complex behavior.
The result can be seen here; you can also find it on StencylForge under the name “Publysher - TD Tutorial #6”.
The Art of Using Placeholder Art
You might have frowned at the quality of the artwork so far. There are a number of reasons for this:
First of all, I have no idea if this game is going to be fun. And let’s be honest, if the gameplay is not good, no amount of splendid graphics will improve this. If on the other hand the gameplay is good, it will also be good with crappy graphics.
Secondly, I’m a developer, not a graphics artist. My time is best spent developing (and maybe writing tutorials); for good graphics (and good sound!) I am going to need a team. And the best way of finding other team members, is to have a base product; this helps your team members trust that you will reach your goal.
I’ve recently published my first sponsored game where I did just that: I started out by publishing this version and asked around for people willing to help me. And so I ended up with this version.
Tip: Only spend time on good-looking graphics and music when your basic game is good enough.
So, head on to StencylForge and download the “Action RPG” tileset. Work on your Test Scene and end with something like this:

Remember: Don’t forget to introduce the appropriate layers.
I won’t pretend (yet!) that this is the most beautiful game ever, but you suddenly get a feel where this is going. And that’s good.
Tip: Placeholder Art is a great way to keep you motivated.
Enemies with a Purpose
TD enemies usually come in waves. During each wave, enemies arrive somewhere on the screen and follow a path to their destination – it’s your tower’s job to prevent them from reaching that destination. In some TD games, enemies follow predetermined paths; in other TD games, enemies find their own path.
Efficient path finding is hard to get right, so in this game I will focus on enemies following a predetermined path. And guess what, Stencyl has a predefined Behavior for that!
So I start with removing the “Wander” and “Wrap Around Screen” behaviors to replace them with the “Follow Path” behavior.

For good measure I’ve also added the “Always Simulate” behavior. This makes it possible for my enemies to appear outside the screen and walk into it – this is a small feature that really improves the feel of your game.
Furthermore, I’ve set the default speed to 5 and left the path empty for now. After all, the exact path depends on the current level and should not be hardwired into my enemies.
Birth of a Critter
The enemies are ready to be added to the scene, but how are we going to do this wave-thing? How are we going to make it easy to make different levels? The answer consists of three parts:
- A separate actor that knows about Waves and creates new enemies at the appropriate moment;
- An accompanying behavior;
- Scene-specific actor customization;
The first two parts resemble a spawning pool from games like StarCraft, so I created an actor called “Spawning Pool”. The spawning pool will be invisible to the player, so I’ve just created a pink square using Stencyl’s image editor. I’ve also increased the size of my scene with an extra column to the right and added the pink squares at the right position:

This of course means that the pink squares will live outside the screen, so I’ve immediately added the “Always Simulate” behavior to them.
Now that the set-up is complete, it’s time to start thinking about the behavior. The behavior will essentially work like this:
- When a new wave is started:
- Every N seconds:
- create a new enemy of the correct type
- tell this enemy what path is should follow
- Every N seconds:
And that’s all! The “Follow Path” behavior will take care of the actual movement of the enemies.
A New Language
Of course, I have omitted one crucial step in the behavior defined above: how does the spawning pool know which enemy to create? I could of course create one or more separate spawning pool behaviors for each scene, but there is an easier way.
In each level, only a certain amount of different enemies will be used; for now, I will assume that four different kinds of enemies is enough. Let’s call these four kinds A, B, C and D. Now I can create a new simple programming language for each wave. Look at the following line:
A B A X A A
This can be interpreted as follows:
- Create an enemy of type A
- Create an enemy of type B
- Create an enemy of type A
- Do not create an enemy
- Create an enemy of type A
- Create an enemy of type A
Just what we need. And now, instead of having to program a different spawning pool for each scene, I can just configure a separate spawning pool using the exact same code!
Tip: Configuring is easier than programming
Creating the Behavior
Maybe this is still a bit too abstract, so let’s have a look at the behavior. It’s quite a complex behavior, so I will just explain the attributes, describe the custom code blocks I’m going to make and show you the resulting behavior. If you have any questions, do not hesitate to ask them at the relevant forum thread on StencylWorks.
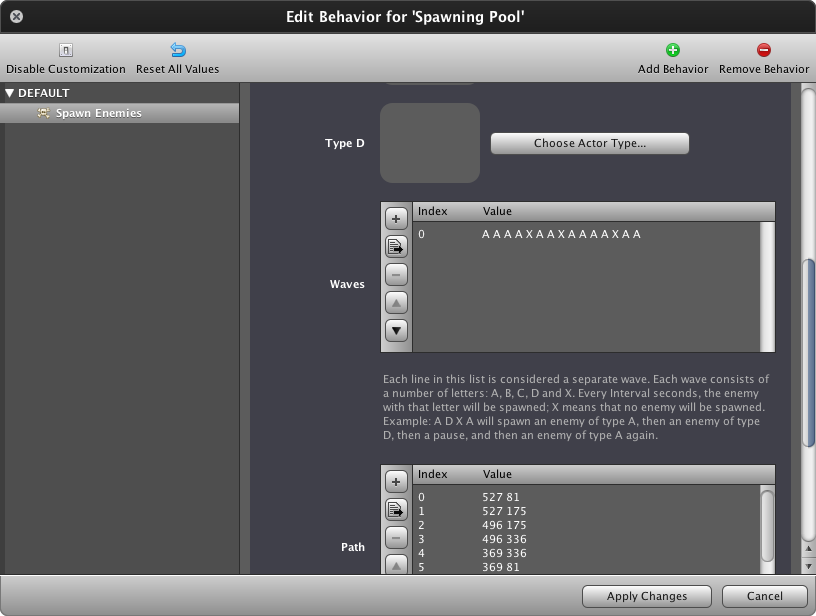
The behavior is going to be called “Spawn Enemies” and it will contain the following attributes:
- Spawning Interval (Number) – this is the number of seconds between each enemy within a wave
- Type A, Type B, Type C, Type D (Actor Type) – these are the attributes containing the correct enemy types
- Waves (List) – this is a list of Text values, where each line is interpreted as a Wave using the language defined above
- Path (List) – this is a list of coordinates (Text values) which is passed on to the enemy just created.
It will consist of four custom blocks:


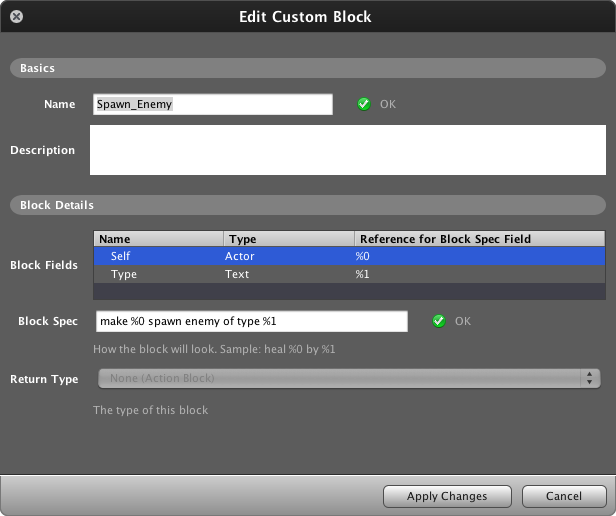
The first block will of course be: Start Wave. We start with a small guard (are there any waves left?) and then we take the first line from our Waves attribute. By taking I mean: read the first line and remove it. Then we call the second block: “make [self] spawn the enemies defined in [List]”
The List in this second block is a list of letters. Every [Spawning Interval] seconds we will take the first letter from this list and call the third block: “make [self] spawn enemy of type [Letter]”.
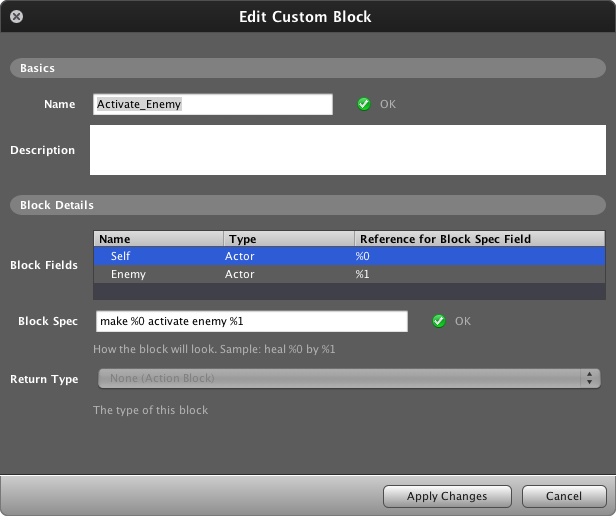
This third block uses a big if..otherwise if…etc block to create an enemy of Type A, Type B, Type C or Type D according to the letter. Then we call the last block: “make [self] activate enemy [actor]”.
The last block then uses the Custom Blocks from “Follow Path” to add the coordinates defined in our “Path” list to the path of our newly created enemy.

Note how this behavior does not concern itself with starting new waves. For easy testing I’ve added a “When created” event which starts the first wave. That’s right: our current version supports only wave.
June 10, 2012 : This behavior might have problems when you reload the scene. This seems to be the result of a bug in StencylWorks. If you encounter this bug, check out part 9 where I present a work-around.
Customizing the Behavior
Up until now I have customized all behaviors by going to the Actor, Behaviors tab. Unfortunately, this makes each actor behave identical on every scene. For most behaviors this is exactly what we want, but our spawning pools should be different on each level.
To do this, go to the Test Scene and double-click on the upper spawning pool. Then, click the “Enable Customization” button.
Now you can enter values for your behavior as usual, but these values will only be relevant to this specific actor in this specific scene.
Scene-specific actor behavior customization is powerful feature of StencylWorks, with one big drawback: if you add, change or remove attributes form your original behavior, the customized behaviors ignore this attribute. I am talking from experience when I tell you that when you have more than 20 scenes, it becomes a hassle to re-customize each actor behavior over and over again.
Tip: Avoid scene-specific actor behavior customization as much as possible. If you think you need it, think again.
Playing the Game
After all this, it’s finally time to start playing the game. Hit the “Test Game” button and watch as your enemies walk along your paths and are being shot by your towers. Just like a real TD game. Apart from the fact that you can’t place towers of course. Which honestly speaking still makes this game severely lacking in the fun department.
Wrapping Up
In this tutorial I have
- improved my own motivation by using Placeholder Art;
- created a Spawning Pool with an associated behavior;
- ensured that my enemies walk along a path, just like a real TD game.
The final result can be seen here, and the game can be downloaded from StencylForge under the name “Publysher - TD Tutorial #6”.
Continue with the next part and learn how we can let the user place towers.
Do the wave
Staying alive
Satisfaction
Creating towers
Follow the path
Choosing your target
Shooting
Getting healthy
Adding towers
the humble beginnings
Making Preparations