Stencil tutorial 8:
Satisfaction
In the previous post I allowed the player to place his own towers to shoot the enemies. This was a great step forward, but one thing was lacking: the satisfaction after the kill. Daniel Cook from LostGarden has a great article on feedback loops, and I want some of that.
So, in this post I will add some visual feedback on killing enemies, and introduce the concept of Scores.
The result can be found here; you can also find it on StencylForge under the name “Publysher – TD Tutorial #8”.
Going For The Kill
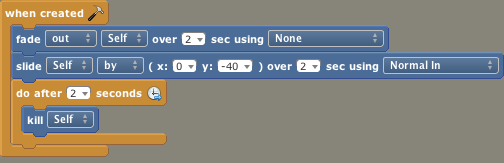
Until now, killed enemies just disappeared – not much feedback there. If you look at other games, you will see that killed enemies usually leave an explosion or smoking ruins. So I’ve decided to show a small fading skull whenever an enemy dies.
The first step was to find a nice skull. After some searching, I found the skull icon I wanted on OpenGameArt.org. It had the right look, the right dimensions, and its license allows me to use it.
Tip: opengameart.org is a great place to find free art if you can’t find it on StencylForge.
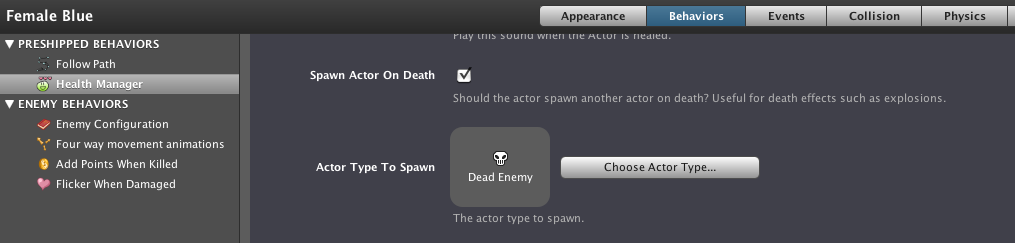
So, how to use this skull? The pre-shipped Health Manager behavior I’m using on my enemies has the option to spawn another actor on death, for precisely this kind of interactions. So I went off and created a new Actor called “Dead Enemy” and placed it in a new Collision Group called “Visual Effects”.
I then proceeded by creating a new Design Mode Actor Behavior called “Dead Enemy Feedback”. To make a long story short: this was the result:
I added the behavior to the Dead Enemy actor and updated my enemies: for each enemy I went to the “Health Manager” behavior, ticked the “Spawn Actor On Death” box and set the “Actor Type To Spawn” field to “Dead Enemy”:
The actual values in my behavior required some tweaking, but I’m quite content with the result.
Keeping Track
Floating skulls might be very satisfying, but most players want more: they want to keep track of their score. I so no reason to disappoint those players, so the next step is to introduce the concept of score.
A score is basically an arbitrary number that is shown somewhere on the screen. The more enemies you kill, the higher your score. In order to show this number on the screen, we require a Font. So let’s start by creating a Score Font.
On your Dashboard tab, go to Fonts and click the big button. The first option you see is the actual TrueType Font you want to use. Whenever I need a fond, I go to dafont.com and this time I downloaded the Transformers Movie font.
Tip: dafont.com is a great place to find new fonts. As always, be sure to check the license of the font!
Now that we have a font, we can go back to Stencyl and configure it. Using the “Choose Custom” button I’ve added the font I just downloaded, and I set the following values:
- Size: 24px
- Color: Yellow
- Gradient Color: Orange
- Gradient Offset: 6px
Under the tab “Effects” I’ve also set the Shadow Blur Amount to 1px to give the font a nice outline – this makes it easier to see on various backgrounds.
Tip: a Blur Amount often gives better results than a Stroke.
Based on this font, it’s time to open our Test Scene and add the pre-shipped Score Manager. I’ve used the following settings:
- Persistent: no
- Score Font: Score Font
- X Offset: 750
Time to test again, and behold: our scene now has a big 0 in the right upper corner.

Scoring
The amount of satisfaction you can get from a big 0 is limited, so the next step is to increase this score whenever an enemy is killed. As it turns out, this is quite easy.
First, create a new Design Mode Actor Behavior called “Add Points When Killed” and add a Number attribute called “Points”.
The implementation is straightforward. Create an Actors > Created or Dies > Specific Actor block and set it to When [Self] is [killed]:
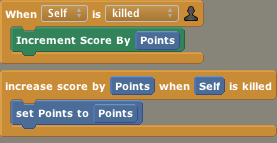
As you can see, I’ve also added a custom block called “Increase score by [Points] when [Self] is killed”. The reason for this block will become clear in the next section.
For now, it is enough to add the behavior to all our enemies and configure the Points attribute. Press Play and voila! Whenever an enemy is killed, our score increases.
That’s what I call satisfaction.
Being Lazy
You might have noticed that this tutorial involves a lot of “update all enemies with a specific behavior and set the default values”. I know I did, and it annoys me. What’s worse, our enemies are 90% identical and the values that make them actually different from each other are spread around over multiple behaviors:
- The number of hitpoints for our enemies are stored in the Health Manager behavior
- The scoring value is stored in the Add Points When Killed behavior
- The speed is stored in the Follow Path behavior
What’s worse: if I decide that damaged enemies should flicker four times instead of three, I have to reconfigure the Flicker When Damaged behavior in every enemy. If I want my health bar to be forty pixels wide, I have to reconfigure the Health Manager in every enemy.
As a programmer, I do not find this satisfactory.
Tip: as a programmer, being lazy is a virtue. Whenever you find yourself doing repetitive tasks, try to automate it. For more tips like these, read The Pragmatic Programmer: From Journeyman to Master.
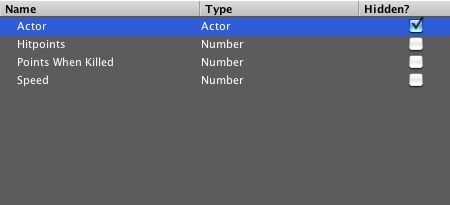
So, I created a new Design Mode Actor Behavior called “Enemy Configuration” with three Number attributes called
- Hitpoints Points
- When Killed
- Speed
The first action was to create a “When Creating” event and add the “Make [self] always active” block. This makes the “Always Simulate” behavior obsolete, so I added my new Enemy Configuration behavior to every enemy and removed the “Always Simulate” behavior.
The second step was to copy the Hitpoints, Points When Killed and Speed values to the appropriate behaviors. Unfortunately, the “When Creating” event is not the right place to do that – when the “When Creating” event is executed, it is possible that the behaviors you require have not yet been added to your actor!
So, I’ve added a second event: the Actors > Created or Dies > Specific Actor event with the following result:
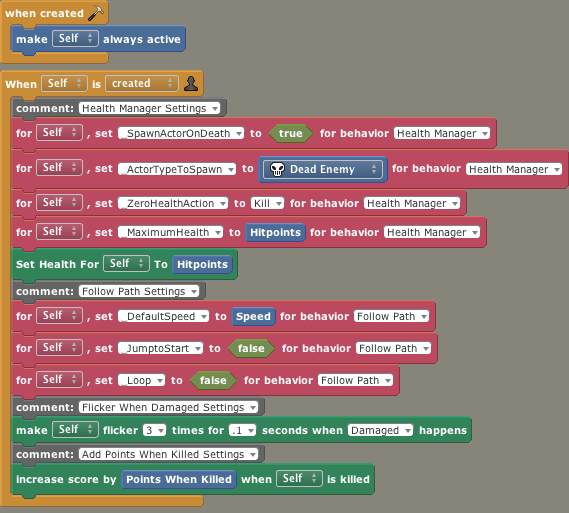
As you can see, I’ve also added some extra default settings for the Health Manager and the Follow Path behaviors. And remember the mysterious “increase score by [Points] when [Self] is killed” block from the previous section? This is the reason I created it. As you can see, I created a similar initialization block for my “Flicker When Damaged” behavior, called “make [Self] flicker [Count] times for [Time] seconds when [Message] happens”.
Tip: if you are using configuration behaviors like this one, always add initialization blocks to your other behaviors.
Tip: when you are using configuration behaviors, avoid the “set [Attribute] to [Value] for [Behavior] blocks as much as possible. For example, the Health Manager’s “Set Health for [Self] to [Health]” block has a lot more functionality than just setting a value.
Being Lazy for Advanced Students
Because my Enemy Configuration behavior is responsible for managing other behaviors, I’d like to call this a Meta Behavior. Stencyl’s support for such meta behaviors is still quite limited; for example, it would be nice if I could also add the Health Manager behavior to my enemy dynamically.
If you create your own Meta Behavior, you will run into some unpleasant surprises. For example, the Health Manager requires you to first set the _MaximumHealth property before settings the Health property – if not, your health bars will have the wrong size. Stuff like this can only be done by trial and error.
Wrapping Up
In this tutorial I have:
- Added visual feedback on dying enemies
- Introduced the Score Manager and found a nice font for it
- Added a new behavior so killing enemies increases my score
- Introduced the concept of Meta Behaviors to centralize your configuration
The result can be seen here, and the game can be downloaded from StencylForge under the name “Publysher – TD Tutorial #8”.
Stay tuned for the next part where we will track the number of player lives!
Do the wave
Staying alive
Satisfaction
Creating towers
Follow the path
Choosing your target
Shooting
Getting healthy
Adding towers
the humble beginnings
Making Preparations