Stencil tutorial 5:
Choosing your target
Up until now, my towers have been somewhat stupid: enemies were only shot when they first approached the tower. After that, the enemies could have a picnic in front of said tower without anything happening. In real life Tower Defense combat situations this is of course unacceptable.
In this part, I will modify my towers to regularly shoot at enemies within range, just like real TD games. I will introduce list attributes, strategies and a bit of custom code.
The result can be seen here; you can also find it on StencylForge under the name “Publysher - TD Tutorial #5”.
How Should My Towers Work?
TD towers usually have an ROF, Rate Of Fire, which means that every N seconds they look at all the enemies within range, pick one and shoot it. Some TD games have towers which deal a bit of damage to every enemy in range, but I will ignore that kind of tower for now.
There are many strategies for picking a target: you can choose a random target, you can select the target with the most hitpoints, you can shoot at the strongest target, and many many more.
Another irksome point has been that my towers have a square range instead of a circular range. So while I’m at it, I will fix that too.
Running In Circles
The last point is the simplest to fix, as long as you’re not afraid to use some custom code. Go the behavior “Shoot Targets in Range”, go to the When Created event and replace the “create region…” block with the following code block:

Play the game, press “D” to activate the Debugger, and voila! A beautiful circular region.
Tip: If the standard Stencyl blocks don’t do what you want, use a custom code block. If you know how to program, refer to the StencylWorks API. If you don’t, the Stencyl Forums are filled with friendly people.
Tip: Avoid custom code blocks as much as possible – they make it harder to port your game to a different platform.
Know Your Enemy
Before we can choose an enemy from all our enemies within range, we have to know which enemies actually are within range. There are two possible approaches using the Stencyl framework:
- Use the “for each actor inside region…” block – this is by far the easiest approach, but it always targets all actors within the region. In our game, this would include our bullets and even our tower.
- Use the “actor (group) enters region”, “actor (group) leaves region”, “actor (group) is killed” events and a List attribute to keep track of the current targets – this approach is a bit more complex, but it provides a lot more flexibility.
So, for various reasons, let’s use approach #2.
The first step is to create a new hidden List attribute called “Enemies in Range”. As the descriptive name implies, this list will point to all the actors that are currently within range.
Then, create three new events: two “Member of Group Enters or Leaves Region” events and one “Member of Group Created or Dies” event:
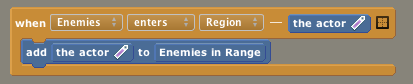

As you can see, this is quite straightforward. Whenever an enemy enters our region, we add it to our list. When the enemy leaves, we remove it from our list.
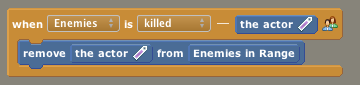
The only tricky part is that according to Stencyl, when an actor dies, it does not leave the region. That’s why we need the extra “When Enemies is killed” block.
Pick One
Now that we have an always up-to-date list of possible targets, it’s time to do the actual choosing. Let’s start by creating two new number attributes for the values we probably want to change later on: “Seconds Between Shots” and “Selection Strategy”.
After you have added the “Selection Strategy” attribute, go to the “Dropdown” tab on the right hand side of the screen:
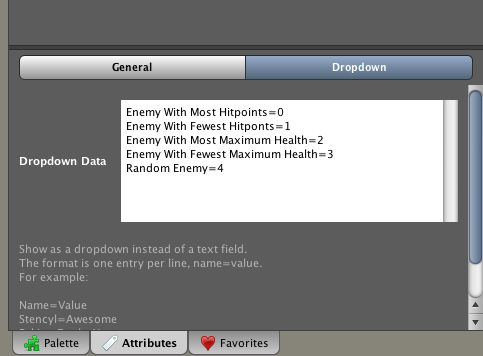
Using a drop-down for these choices makes sure that six months from now, when we are still working on this game, we still know what the number 2 actually means.
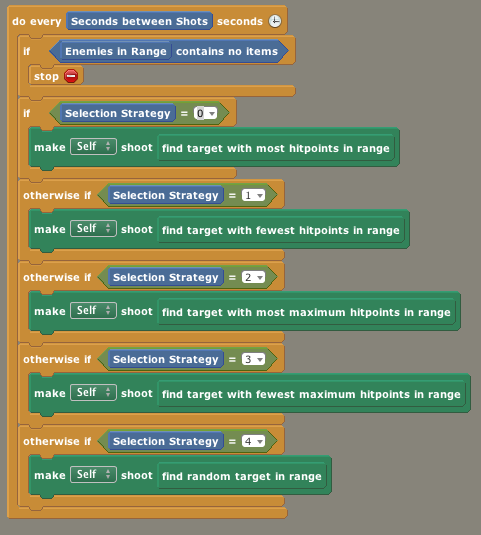
Now, create an “Every N seconds” event:
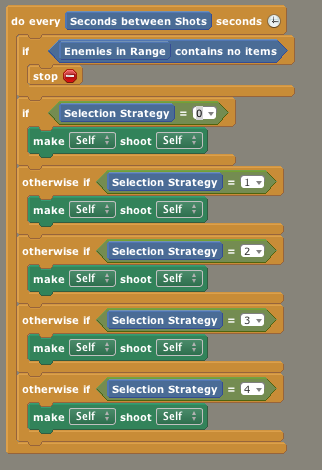
If you’ve remembered the tips from part 4, you will immediately recognize the guard at the top of this event: if there are no enemies in range, just stop what you’re doing.
What follows is a big if-otherwise if-otherwise if… construction – depending on the actual value of our Selection Strategy we are going to shoot another target. The only question remains: whom to shoot?
Once again, the answer consists of creating a new Custom Block event:
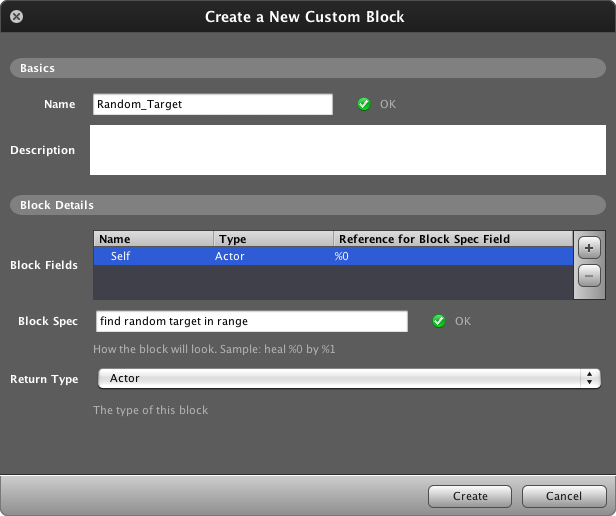
Take a good look at the last drop-down: instead of the default “None (Action Block)” we say that this block returns an Actor. When you click “OK” and go to the Custom Palette, you can see what this means: our newly created “find random target in range” block is rectangular instead of jigsaw-shaped. This means that we can drag the “find random target in range” block into the “make [self] shoot at […]” block!
Create five different Custom Blocks, one for each strategy outlined above and implement the “find random target in range” as follows:

We can now finish our “Every N secs” event:
Finding the Best Element in a List
All that remains is implementing the four remaining Custom Blocks. Each of these blocks involves the same logic: find the best choice in a list. This is a common idiom in Stencyl, so it deserves its own little chapter in this tutorial.
To do this, we need a new hidden attribute called “Best Target So Far”. Each block has basically the same algorithm:
- Choose an arbitrary element from our list and call it “Best Target So Far”
- For each item in the list:
- If the current item is better than “Best Target So Far”, name our current item “Best Item So Far”
- We now have the best item.
Putting It All Together
Armed with this knowledge, we can now put it all together, resulting in the following behavior:
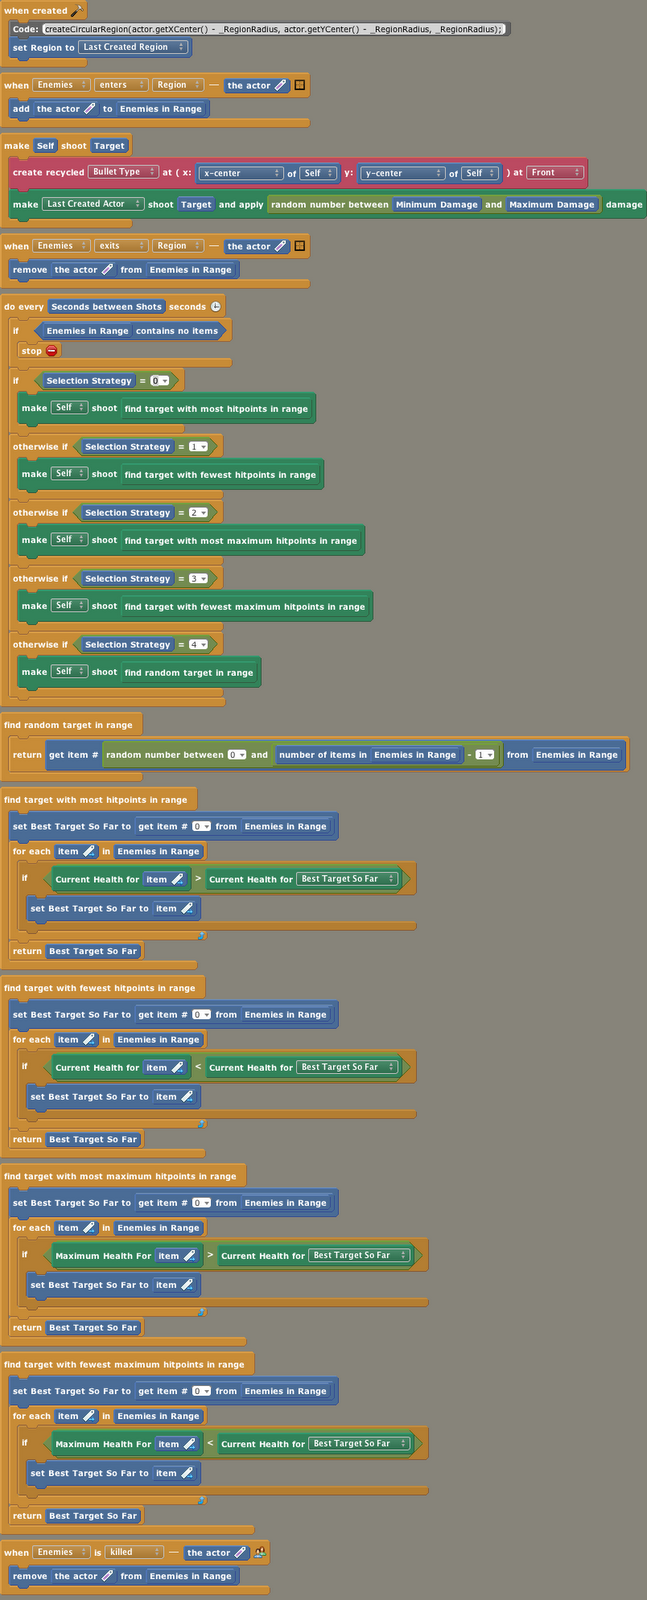
Yes, that’s quite a bit of code. But, our code has been cut up in little pieces, and the entire behavior still has only one goal: shooting enemies.
All that remains is pressing the big “Test Game” button and marvel at the intelligence of our towers. Of course, you should experiment with different ranges and strategies as much as you like.
Wrapping Up
In this tutorial I have:
- introduced various ways of selecting an enemy
- used a bit of custom code to improve my game with circular regions
- explained the standard idiom of finding the best element in a list
The final result can be seen here and the game can be downloaded from StencylForge under the name “Publysher - TD Tutorial #5”.
Continue with the next part and learn how to make our enemies come in waves.
Do the wave
Staying alive
Satisfaction
Creating towers
Follow the path
Choosing your target
Shooting
Getting healthy
Adding towers
the humble beginnings
Making Preparations