Stencil tutorial 10:
Do the wave
Last week I talked explained how to lose. This week, I’ll talk about winning. After a short introduction on what it means to win a Tower Defense level, the tutorial will explain how to have multiple waves and how to recognize that the player has won.
The result of this part can be seen here; you can also find it on StencylForge under the name “Publysher – TD Tutorial part #10”.
Winning: What does it mean?
In a typical tower defense game you win the level when you have survived all waves; in other words: when all waves have passed and you have at least one life left.
This of course begs the question: what does it mean for a wave to have passed? In our current game, a wave has passed when every enemy that has been spawned by this wave has left the screen – either by being killed or by passing the finish line.
So in order to implement winning in our Tower Defense game, we need to do the following:
- Detect when a wave has passed
- Detect when all the waves have passed and start the “player won level” feedback.
For now, the feedback will consist of a happy “You Won” message, after which the level will start again.
Multiple Waves
A closely related aspect is the concept of multiple waves. Right now, our Tower Defense game supports only one single wave – however, once a wave has been exhausted a new wave ought to arrive. This new wave should start after a predetermined time, and the player should have the possibility to call it early.
In order to have a game with multiple waves, we need the following:
- Detect when a wave has passed
- Start a new wave after the previous wave has passed
- Show how many waves there are left
- Show a button to call the next wave early
Notice how the first requirement is identical to the first requirement of winning the game!
Structure
Let’s start with showing the number of waves. Each Tower defense game has its own method of doing this, but for this game we’ll keep it simple: just an icon with two numbers: the current wave and the total number of waves. If this sounds familiar, it should be – it is going to be very similar to the Number of Lives Manager and the Score Manager. When a wave is exhausted, a button will show up somewhere on the screen. Clicking this button will cause the next wave to appear; if a certain amount of time has elapsed and the player hasn’t clicked the button, the next wave will appear anyway.
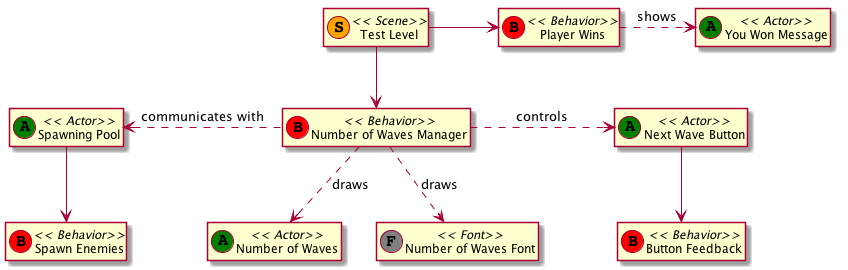
In order to implement this, I will create a few actors, two new behaviors and I will extend a number of existing behaviors. The diagram below gives an overview of the various new and modified components:
Intermezzo: UML
Quite a complicated diagram, isn’t it? By the way, this kind of drawing is called an UML diagram, and it is a great way to visualize the different components in your game and to track the interactions between them.
To read a diagram like this, start at the top where I have drawn the our Test Level. For this part of the tutorial, there are two relevant behaviors attached called “Player Wins” and “Number of Waves Manager”. The latter behavior communicates with three different actors, called “Spawning Pool” (remember that one?), “Number of Waves” and “Next Wave Button”, and it uses a new Font for the drawing called “Waves Font”.
The “Spawning Pool” actor still has to the “Spawn Enemies” behavior I’ve introduced in an earlier post. The “Next Wave Button” actor has a “Button Feedback” behavior. The “Number of Waves” actor has no behaviors at all.
As you can see, this diagram does not visualize the entire tower defense game. Part of the trick in creating such diagrams is omitting everything you don’t need.
Tip: making diagrams such as these really helps in getting a grip on your own game.
Preparations
The previous picture makes it easy to start setting up a number of new actors:
- Number of Waves actor: this is just a simple actor with a nice skull icon from part 8.
- You Win Message actor: this one is similar to the You Lost message I created earlier, and it contains the existing “Message” behavior
- Waves Font: a copy of the Score Font, but using slightly different colors to match the colors of our skull
- Next Wave Button actor: a simple actor containing a button which I created on this website.
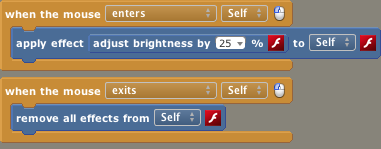
- Button Feedback behavior: a simple design mode actor behavior to show some feedback when hovering over the button.
And of course, because I will need them later on:
- a design mode scene behavior called “Number of Waves Manager”
- a design mode scene behavior called “Player Wins”
You can attach these behaviors to the test scene; their contents will be explained in the remainder of this tutorial.
If you haven’t done so already, now is a good time to add some extra waves to your Enemy Spawners – this will make testing so much easier later on.
Counting Waves
It’s time to do some thinking again. As I pointed out above, we will need some information to decide if we have won. Let’s start with some definitions:
- Active Spawner – an enemy spawner that is currently busy spawning enemies
- Active Enemy – an enemy that has been spawned, has not yet been killed by a tower and has not yet passed the finish line.
Based on these definitions, we can now determine if a wave has passed:
A wave has passed if there are no more active spawners and if there are no more active enemies.
This does mean that we will need to know if a spawner is active or not. Let’s make sure this happens.
Modifying the Enemy Spawner
The first thing I’m going to do is to change the enemy spawner. Remember how we added a “start next wave” call in the “on created” event? Let’s remove that.
The next step is a small modification to the “start wave” event. When a new wave starts, this behavior will trigger a new event called “spawner_started”. Following this train of thought, let’s also modify the “execute wave” event: when all enemies for the current wave have been spawned, let’s trigger an event called “spawner_finished”.
And finally, thinking ahead a bit, let’s make new custom block called ‘number of waves’:
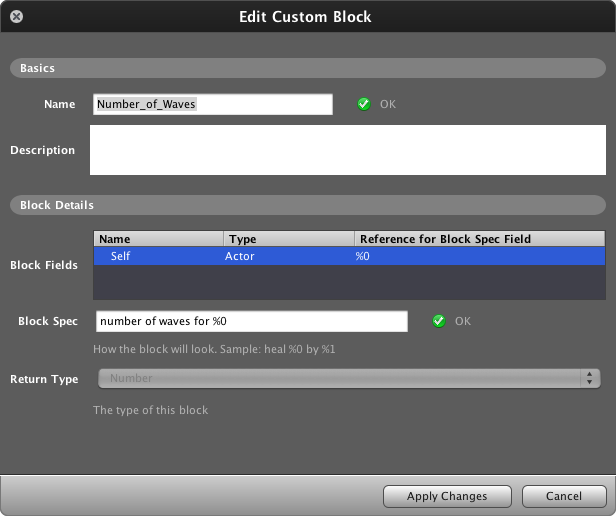
The end-result should look like this:

Number of Waves Manager
And now everything is in place for our coup-de-grace: the Number of Waves Manager. This behavior has a number of responsibilities:
- Know how many waves there will be
- Know which wave we’re currently spawning
- Draw these numbers on the screen
- Keep track of the number of active spawners, so we can determine if there are any active spawners left
- Keep track of the number of active enemies, so we can determine if there are any enemies left
- Draw the “Next Wave” button when required
- Start a new wave when the “Next Wave” button has been clicked
- Trigger a “no more enemies” event when all the waves have been exhausted
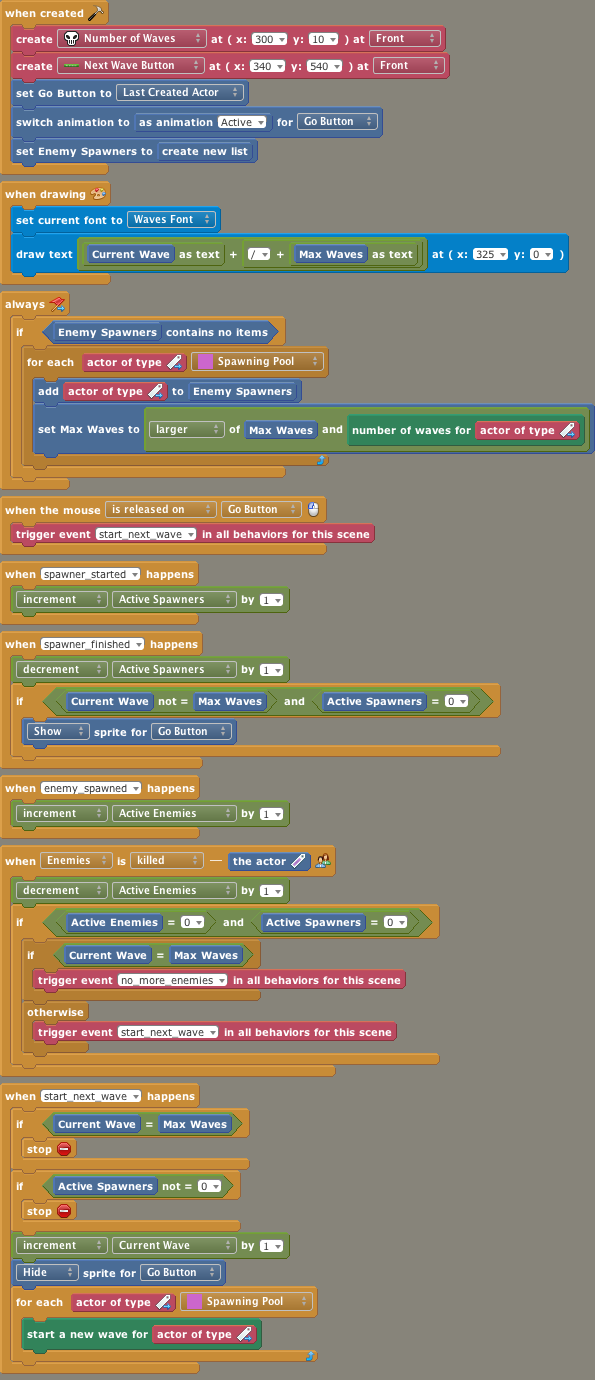
How are we going to do this?
We know how many waves there will be in total by asking all the enemy spawners how many waves they have. The largest of those numbers is the total number of waves. We will remember this in a hidden Number attribute called “Max Waves”.
We can keep track of the current wave by using a hidden Number attribute called “Number of Waves”. This number will initially be 0, and it will be increased whenever a new wave starts.
These attributes can then be used in a “when drawing” event to draw the numbers on the screen.
We can also keep track of the number of active spawners by listening to the “spawner started” event introduced in the previous section. The behavior will get a new hidden Number attribute called “Active Spawners”. This number will be increased whenever a “spawner started” event is triggered, and it will be decreased whenever a “spawner finished” event is triggered.
For the number of active enemies a new hidden Number attribute is created called “Active Enemies”. This number is increased whenever an enemy is created, and it will be decreased whenever an enemy dies. Remember, enemies also die when they cross the finish line.
If a spawner has finished, and the resulting number of active spawners is zero, it is time to show the “Next Wave” button. This button is stored in a hidden Actor attribute called “Go Button”. The button is created and hidden in a “When Creating” event, and it is shown here.
Using a Mouse Click event, we can determine if the user clicked on the “Next Wave” button. If this happens, we call the “Start next wave” event on our enemy spawners, and hide the button again.
Finally, if an enemy dies, the number of active enemies is zero and the number of active spawners is zero, we know that the current wave has finished. Now there are two choices: either there are waves left, in which case we start a new wave, or there are no more waves left, in which case the player has won this level. Time to trigger a “no more enemies” event.
Combining all of this, we get the following behavior:
You Won
The “no more enemies” event is captured by the “Player Wins” behavior. This behavior just makes sure that all the towers are disabled; it then shows the You Won message and, for now, reloads the game.

If you’re feeling adventurous, you can create new levels for your game and make sure the next level is loaded when the player has won.
Wrapping Up
In this part of the tutorial, I have:
- Introduced the concept winning
- Introduced the concept of UML diagrams
- Determined how all the different actors and behaviors can work together to give the player the right experience
- Created a lot of new actors and behaviors
The final result can be seen here, and the game can be downloaded from StencylForge under the name “Publysher – TD Tutorial #10”.
The End?
This is the end of my tutorial. My blog is filled with interesting other technologies, but I will no longer be writing about Stencyl game development. Of course, this does not mean that it is the end for your game!
By following this tutorial you have created a solid basis to experiment further on. Whenever you get stuck, don’t hesitate to ask around in the Stencyl Forums – they are filled with friendly people who are more than willing to help you.
If you have created an interesting tower defense game based on this tutorial, let me know and I will give it special attention in this blog.
Happy Stencyling!
Do the wave
Staying alive
Satisfaction
Creating towers
Follow the path
Choosing your target
Shooting
Getting healthy
Adding towers
the humble beginnings
Making Preparations