Stencil tutorial 4:
Shooting
So far my towers have been shooting at enemies with invisible death rays. This is of course state-of-the-art weaponry, but most players prefer a bit of feedback.
In this part, I will replace the invisible death rays by animated bullets. Along the way, you might learn a bit about basic game mathematics.
The result can be seen here; you can also download it from StencylForge under the name “Publysher – TD Tutorial #4”.
Bullets – How Do They Work?
In real life, shooting at enemies works a bit like this:
- The shooter aims at the target
- The shooter follows the target and aims a bit in front of it, depending on the distance to the target
- The shooter shoots a bullet
- The bullet flies to the indicated spot
- When the bullet hits the target, it damages and maybe kills the target
- Depending on the quality of the marksman, the bullet might miss
This would translate to Stencyl/TD terms like this:
- The tower actor chooses a target enemy actor
- The tower actor calculates the distance to the target actor, determines how long the bullet will travel, and calculates the probable new position of the enemy after that time
- The tower actor creates a bullet actor
- The tower actor tells the bullet actor to go the designated spot
- When the bullet actor collides with an enemy actor, it deals damage and dies
- When the bullet actor reaches the designated spot it dies
This looks like a great translation, but look at number 6: towers missing their mark is not very usual in TD games. Furthermore, step 2 is more complicated than it looks, especially with our wandering actors. And finally, using collision detection for bullets might be a bit of overkill, given the fact that we will have a lot of bullets flying around.
So, to make my life easier and the shooting more TD like, I will use the following algorithm:
- The tower actor chooses a target enemy actor
- The tower actor creates a bullet actor and tells it to damage this enemy
- The bullet actor flies to the target, continually updating its direction, making it more like a guided missile than a bullet
- When the bullet actor reaches the position of the target, it deals damage and dies.
There, I just got rid of predicting positions and collision detection. In most cases, bullets will still travel to their target in an almost straight line; sometimes the bullet will swerve a little, but that might actually make for a nice visual effect.
Tip: Only look at real life to see how something should look, not how it should work. In games, approximating real life is often better than emulating real life.
A Bit of Math
Step 3 of the algorithm defined above still contains a bit of trickery: the bullet continually updates its direction. But how to do that? The answer lies in mathematics, trigonometry to be exactly. I will not go too much into the details, there are plenty of online resources for that, but have a look at the following diagram:
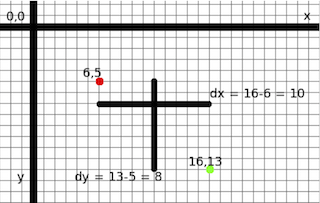
In this image, we can see a red dot and a green dot at screen coordinates (6,5) and (16, 13) respectively. Whenever we want to know something about the relations between those points, we calculate dx and dy, the difference between their x coordinate and the difference between their y coordinate. As you can see in the picture, in this case dx = 10 and dy = 3.
For example, if we’d want to find out the exact distance between the red dot and the green dot, we’d use the Theorem of Pythagoras and calculate the distance as the square root of (dx * dx + dy * dy).
Another example would be the angle of the straight line between the red dot and the green dot. Without going into details, this would be calculated as atan2(x, y), which would give us the angle in radians. If you want to know why, read this article on Wikipedia.
Enough math for now. Let’s create a bullet.
Tip: Every 2D game programmer should at least learn the concepts described above.
Biting the Bullet
Start by importing this resource. This will create a new actor called “Bullet”. Create a new collision group called “Bullets” and make sure your new actor is a member of this group. If you’ve forgotten how to do this, please read Part 2 of this tutorial again.
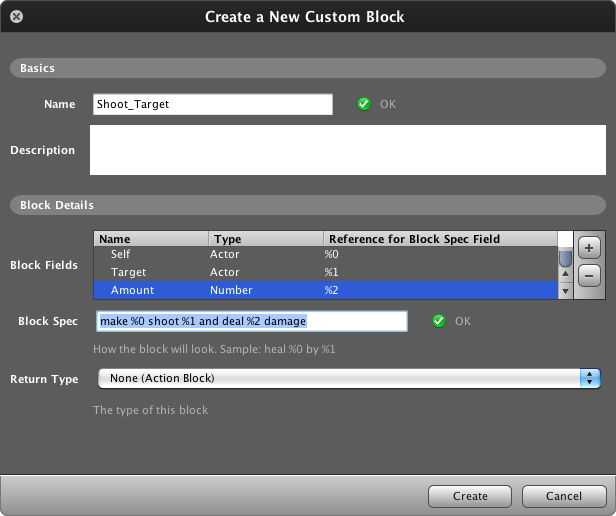
The next step is to create a new Design mode Actor behavior called “Flying Bullet”. This behavior will contain the logic to follow our target and deal damage once the bullet reaches it. Remembering the tips from part 3, let’s start by creating a new custom block for this action: make [self] shoot [target actor] and deal [amount] damage.
So, how to implement this? One big hint was the phrase “continually updating its direction”. Whenever you hear yourself say “continually”, rest assured that you will need a “When updating” event.
Tip: Always tell yourself what you want your program to do. After a while, you will notice how certain keywords in your explanation point you in the right direction.
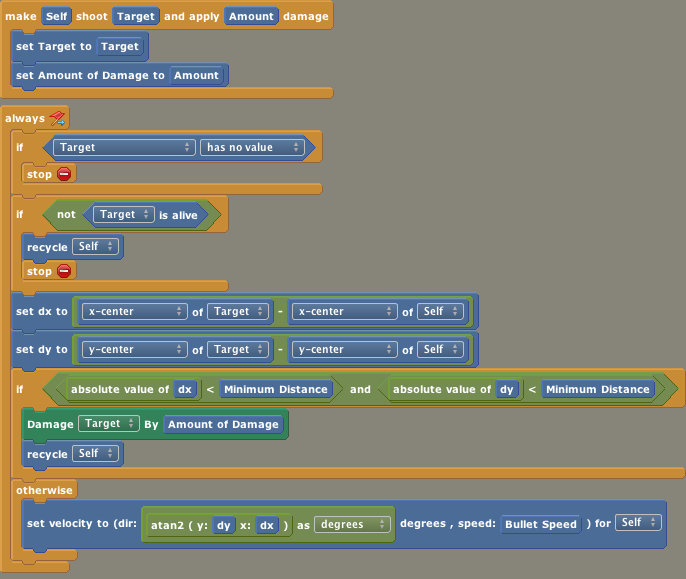
Unfortunately, our “make [self] shoot [target actor] and deal [amount] damage” event and our “When updating” event are two different events – this means that the parameters [target actor] and [amount] cannot be shared between those events. So, I’ve created two hidden behavior attributes: one actor attribute called “Target” and one number attribute called “Amount of Damage”. The “make [self] shoot [target actor] and deal [amount] damage” block is just there to remember fill these attributes.
The “When updating” event is a lot more interesting. Essentially, at each update we calculate our angle using the atan(dy, dx) technique described above and use the “set velocity to [dir] degrees, speed [speed]”. Before we do that, we check if our position is equal to the position of our target. If so, we apply the damage and kill ourselves.
If you look at the behavior, you can see that I did not tell the entire story. Some highlights:
- I didn’t know what the optimal speed would be, so remembering my own tip I’ve created an attribute for it.
- I do not check if the bullet and the enemy have the same coordinates. Instead, I check if the dx and dy are small enough. This prevents bullets from ‘overshooting’, and in the end, I do not really care if the coordinates are exactly the same – as long as it looks natural, I’m happy.
- At the beginning of the When updating block, there are two so-called guards: I check if the Target attribute has indeed been filled, and I check if the Target is still alive (it might have been killed by another bullet in the mean time). If not, I stop (which means that the lower blocks are not evaluated at this moment – they might be evaluated at the next update).
Tip: Always think about unlikely conditions when creating behaviors.
Shooting the Bullet
At this point, we’re nearly there. All that remains is to change the “Shoot Targets in Range” behavior to actually fire the bullet:
Luckily, I had already created a separate “Shoot Target” block, so it was easy to find out where I had to change my code.
After this change, it’s time for some play testing! As you can see, the towers now fires actual bullets; when the target moves too fast, the bullet corrects its course and it always hits.
This is a nice moment to play around with the values in our behaviors. For example, I’ve set the “Bullet Speed” in the “Flying Bullet” behavior to 15. Try setting it to 7 and see how some bullets never reach their target. Try setting to 150 and notice how you can hardly see the bullets anymore. Choosing the right values is a matter of taste and practice.
Tip: Always play around with your values. Sometimes strange values can produce wonderful results.
If you test the game long enough, you might spot some weird behavior: our enemies have a Wrap around Screen behavior, and whenever they do that, the bullets take an unnatural turn. Given that our enemies will not remain stupid wandering sods forever, this is perfectly acceptable for now.
Wrapping Up
In this tutorial I have:
- created a Bullet actor
- used some basic mathematics to create a Flying Bullet behavior
- updated my basic “Shoot targets in range” behavior to actually fire bullets instead of invisible death rays.
The final result can be seen here and the game can be downloaded from StencylForge under the name “Publysher - TD Tutorial #4”.
In the next part of this tutorial I will improve the actual targeting of enemies.
Do the wave
Staying alive
Satisfaction
Creating towers
Follow the path
Choosing your target
Shooting
Getting healthy
Adding towers
the humble beginnings
Making Preparations